| Lesson Six: Tab Key, Bulleting, Numbering, Undo, Redo, Printing, and Help
This lesson is on the Tab key, bulleting, numbering, undo, redo, printing, and help. To begin this lesson, open Microsoft Word.
The Tab Key
The default tab setting for Microsoft Word is .5 inches. If you press the Tab key, the cursor will move 1/2 inch across the page and an arrow will appear on the screen. The arrow is a nonprinting character, so when you print your document the arrow will not print.
Illustration
- Press the Tab key a few times. Note how you move across the page.
Bullets and Numbering
In Microsoft Word, you can easily create bulleted or numbered lists of items. Several bulleting and numbering styles are available, as shown in the examples. You select the one you wish to use. Try the exercises to see how it works.
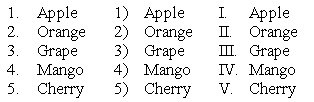
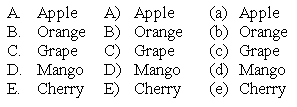
Examples -- Numbering

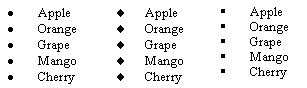
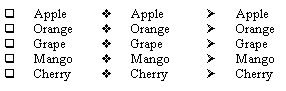
Examples -- Bulleting

Exercise 1
- Type the following as shown.
Apple
Orange
Grape
Mango
Cherry
- Highlight the words you just typed.
- Click on Format.
- Highlight Bullets and Numbering. Press Enter.
- Click on the Numbered tab, if it is not in the front.
- Several styles are available to you. Click on the style you want to use.
- Click on OK.
- Your list should now be numbered.
To remove the numbering:
- Highlight the list again.
- Click on Format.
- Highlight Bullets and Numbering. Press Enter.
- Click on None.
- Click on OK.
Alternate Method -- Numbering using the Icon.
- Highlight the list you typed.
- Click on the Numbering icon
 on the Formatting toolbar. on the Formatting toolbar.
- Your list should now be numbered.
To remove the numbering:
- Highlight the list again.
- Click again on the Numbering icon .
Bulleting
- Highlight the list you typed.
- Click on Format.
- Highlight Bullets and Numbering. Press Enter.
- Click on the Bulleted tab, if it is not in the front.
- Several styles are available to you. Click on the style you want to use.
- Click on OK.
- Your list should now be bulleted.
To remove bulleting:
- Highlight the list again.
- Click on Format.
- Highlight Bullets and Numbering. Press Enter.
- Click on None.
- Click on OK.
Alternate Method -- Bulleting Using the Icon
- Highlight the list you typed.
- Click on the Bullets icon
 on the Formatting toolbar. on the Formatting toolbar.
- Your list should now be bulleted.
To remove the bulleting:
- Highlight the list again.
- Click on the Bullets icon again.
Undo & Redo
You can quickly undo most commands you execute by using Undo. If you then change your mind, you can use Redo.
Exercise 2
- Type Undo example.
- Click on Edit.
- Highlight Undo Typing. Press Enter.
- The typing should disappear.
- Click on Edit.
- Highlight Redo Typing. Press Enter.
- The typing should reappear.
- Highlight "Undo example."
- Press Ctrl-b to bold.
- Click on Edit.
- Highlight Undo Bold. Press Enter.
- The bolding should be removed.
- Click on Edit.
- Highlight Redo Bold. Press Enter.
- Your text should be bold again.
Alternate Method -- Undo & Redo by Using Keys
- Type: Undo example.
- Press Ctrl-z. The typing should disappear.
- Press Ctrl-y. The typing should reappear.
- Highlight "Undo example."
- Press Ctrl-u to underline.
- Press Ctrl-z. The underline should be removed.
- Press Ctrl-y. The underline should reappear.
Save File
Save your file by following these instructions:
- Click on File.
- Highlight Save As. Press Enter.
- Specify the correct folder in the Save in field.
- Name your file by typing lesson6.doc in the File Name field.
- Click on Save. Don't exit Microsoft Word.
File Close
Close your file by following these instructions. We are going to open a new file for the next exercise.
- Click on File.
- Highlight Close. Press Enter.
Open New File
- Click on File.
- Highlight New. Press Enter.
- Click on OK.
Exercise 3
This exercise is intended to bring together all the things you have learned. Type and save the following document. Refer to the previous lessons and exercises if you need help.
Selecting Accounting Software
Many accounting software packages are on the market today. Selecting the right one for your company can be a daunting task. You must take many factors into consideration, such as software, hardware, accounting issues, and internal needs that might be specific to your company.
When reviewing software features, you need look at a long list of criteria. Among them are these:
- Reporting
- Security
- Ease of use
- Customizability
- Operating system
When looking at reporting, you must review these two reporting features:
| Standard reports: |
Standard reports are reports that come with the software when you purchase it. You will want to check these reports against your current reports. |
| |
|
| Custom reports: |
Customized reporting is the capability to create your own custom reports. If you need information that is not contained in the standard reports, you will need to write your own customized reports. |
Printing
After you have finished typing your document, you will want to print it. While preparing to print, you can specify the number of copies you want and the pages you want to print.
Exercise 3 -- Print Your Document
- Click on File.
- Highlight Print. Press Enter.
- Click on OK.
Alternate Method - Printing by Using the Icon
- Click on the Print icon
 on the Standard toolbar. on the Standard toolbar.
Help
If you need more information on executing a Microsoft Word command, you can receive help at any time by pressing F1 or by clicking on Help on the Menu bar.
Demonstrative and Interactive Lessons:
Bullets and Numbering - Demonstrative Lesson
Bullets and Numbering - Interactive Lesson
|